Thursday, September 27, 2012

Chicken Pens

We've been asked countless times how we make our field pens.

It is that time of year for the boring part of what we do. I am so proud of Armand and our son for making this time for pen maintenance. Right now, they are making two brand new pens in our front yard (does a farm have a front yard?).

We'll be needing these pens for the turkeys as we thin them out and put fewer into each pen.

They start with a wooden frame and they arch 20' sticks of PVC to make the "roof".
They put chicken netting about 1/2 way up and hardware "cloth" on the bottom few inches to keep the predators out. They will cover the pvc with a used billboard vinyl. You can see that the bottom of the pens is open, thus allowing the birds to have access to fresh grass and bugs at all times. The ends are open (but covered with chicken netting) allowing the birds access to sunshine and weather.

The guys haven't covered the tops with a vinyl yet. Maybe I can add a couple of pictures when they do. I couldn't figure out how to get any of the pictures to hyperlink to a larger picture, so what you see is what you get.

At current prices, it costs us about $100 to build a pen. They last for several years with minor repairs and maintenance. If you run 75 birds to a pen, and run 6 batches a season, that's 450 birds using the pen. That works out to be 22¢ a bird to live in that pen for only one season. If you use that pen for TWO seasons, now it's only 11¢ a bird to build that nice pen. All of a sudden, it's not that expensive.

Wooden frame with arched sticks of PVC for roof


Can you see the corner brace in the corner? We brace 2 corners.


Chicken netting goes 1/2 way up on both sides. Armand is putting chicken netting on the back wall.  


Hardware "cloth" to keep predators out.
Our son is building a door.
Attaching the PVC door
He's proud of what he does!


Friday, March 9, 2012

Mozzarella Cheese

Homemade Mozzarella Cheese from fresh cow's milk


I made fresh mozzarella cheese from this morning's milk. I got the idea to take a few pictures along the way.

I will glaze over the instructions here and include the recipe at the end. I started with 2 gallons of fresh milk. Dissolve 2-1/2 very level teaspoons citric acid into 1/4 cup water. Stir into cool milk. At this point, gently warm to 88°F. Be careful not to overheat.

Stir 1/2 tsp. liquid rennet into 1/4 cup water. Stir into warm milk, then allow milk to sit undisturbed for 20 minutes. At this point, the milk become solid and pull away from the edges of the pan.

With a long knife, cut the curd into 1/2" cubes.


After cutting, let remain undisturbed for 5 minutes. Apply low heat and slowly heat the curds to 108°F. Continue to stir gently, so as to keep the curds separated.


Curds are heated to 108°F.

Drain curds in colander for 15 minutes. You can save the whey for fermented foods or discard it. While curds are draining, mix 1/2 cup Real Salt into 1 gallon water and heat to 170°F.

After draining, cut the curds into 1/2" strips and add your curd strips into the hot salt water.

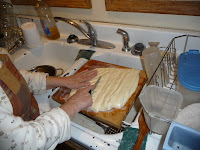
Using a wooden spoon, begin to stretch the curd in an upward motion. The curd will become plastic-like and shiny. Stretch your curds for 10 minutes. I use a timer. You will then place the curd on a board and knead as you would bread.You are nearly done. At this point you can begin to package it for refrigeration. Our family likes to snack on the cheese, so I make little homemade cheese sticks.

I consistently get about 1-3/4# of cheese out of 2 gallons of milk.


Wednesday, August 31, 2011


I'm not used to this blogging thing. For whatever reason, I don't quite know what to say. We have been building for (ahem... ) a while now. The guys are making great progress this week. Rick, our framer, asked for my camera and wanted to take a picture of us. :)

I will try and put up some pictures of where things are at.


Friday, June 3, 2011

Making hay!


We were not farmers when we got married 30 years ago. We got married in the 3rd week of May. Exactly the time of year when a farmer in southern Missouri needs to be baling the first cutting of hay. Armand mowed about 6 acres of grass on Wednesday, the 1st of June. That is really late. We are blessed that this cutting is so good. I've heard farmers talk about tons/acre. I have no idea how to figure that. All I know is that these strong young men put over 400 bales of hay in our barn today.


These kids worked SO hard today. It was nearly 100*F and the hay had to get picked up. There were much needed breaks and a couple gallons of Orange Juice downed, but they got the job done. Bechard Family Farm wants to say THANK YOU to all these young people who worked in this miserable heat.


Monday, May 9, 2011

Chickens


Our first chicken day of 2011 is on Tuesday, May 17th. Only 8 days away! You can pick up at the farm on the 17th and we will be in Springfield in front of the North Mama Jean's market on Wednesday, May 18th. We are eagerly anticipating this day. By now, most of us have run out of chickens in our freezers. It is time for some FRESH chicken! 2011 marks the first time Bechard Family Farm has been able to offer a 100% GMO-free chicken! Why has it taken so long? Prior to this year, the only way we could get GMO-free grain was to purchase it in truck-load quantities. Add to that the infrastructure of housing all this grain. You can quickly see why we were not able to begin that endeavor. This year, a feed mill about 30 miles away has started carrying this new feed in very limited quantities. We have been spoiled by our other mill. They are only 5 miles away AND they deliver! We would usually have them bring out 3 tons at a time. We are trying to adapt our schedule to allow for time for Farmer to go get the new feed. So far, that has worked out. We will find out next week if there will be a taste difference. We already know there is a huge nutritional difference. Come join the real food revolution. Order your Bechard Farm GMO-free chickens today!